Monday 15 June 2009

Strawberries and Chocolate Cake

Strawberries and Chocolate Cake

Ingredients:

Chocolate Sponge Cake:
8-inch cake
4 oz sugar
4 oz butter
3.25 oz self-raising flour
0.75 oz cacao powder
1/2 teaspoon baking powder

10-inch cake
6 oz sugar
2 medium - large eggs
6 oz butter
5 oz self-raising flour
1 oz cacao powder
3/4 teaspoon baking powder

Filling & Toppings:
600ml whipping cream
3 tablespoon icing sugar
10 strawberries, hulled and diced
20 strawberries, hulled

Method:

1. Choose the cake tin for your cake that you are going to make. Line the bottom and the side of the tin with non-stick baking paper or greaseproof paper. Preheat the oven at 180oC.
2. In a large mixing bowl, beat sugar and eggs together until fluffy and consistence. Then beat in the butter until creamy and smooth.
3. Sieve the flour, cacao powder and baking powder into the creamy mix. Use a wooden spoon to fold the flour into the mix gently. At the end you should have a thick brown batter.
4. Pour the batter into the cake tin. Bake the cake for 25-30 minutes for 8-inch cake (30-40 minutes for 10-inch). Remove from oven, keep the cake inside the tin for 10 minutes.
5. Removed the cake from the tin, put it on a wire rack, cover with a clean towel and cool to room temperature. Remember, don't chill the cake at this stage. It is better to bake the cake the night before and decorate it the day after, it gives the cake more time to cool down.
6. Whip cream and sugar in a clean and dry mixing bowl until soft peak and smooth. Slice the cake in the middle, so you get two rounds of thin sponge cake. Spread the cream on top of both sponges. Scatter the diced strawberries on one of the sponge. Put the other layer on top of the one with strawberry dices. Arrange the hulled strawberries on top of cake. It can be kept in fridge for 2-3 days. Done!

Note: The amount of cream and sugar is depended on personal taste, there is no fix proportion.

Thursday 11 December 2008

Mushroom and Chestnut Puds with Red wine sauce


A very interesting vegetarian version of traditional suet pudding. The earthy and nutty taste from the mushroom and sweetness from the chestnut makes the pudding taste meaty. An absolute veggie food but even committed canivores will also love it.
I know the picture on your left is not exactly appetizing, I looks more like halloween food, but honestly, it looks greatin real and taste even better. Trust me.

Mushroom and Chestnut Puds with Red wine sauce

Ingredients:
For the filling
1 tbsp olive oil, plus extra for greasing
250g pack portabellini mushrooms, quartered (or mixed mushroom, like chestnut, oyster, shiitake)
1 clove garlic, crushed
½ x 200g pack Merchant Gourmet Whole Chestnuts Roasted & Ready To Use
1 tbsp tomato purée
100ml red wine


For the suet crust:
150g self-raising flour
75g Atora Light Shredded Vegetable Suet


Method:
1.Lightly grease 2 x 300ml pudding basins with a little oil and set aside. Heat the olive oil in a large frying pan and add the mushrooms. Fry for 3-4 minutes, stirring often, until they start to turn golden. Add the garlic and cook for another minute. Stir often to avoid catching at the bottom. Fry the mushroom until the liquid from itself is absorbed. Stir in the chestnuts, tomato purée and red wine. Season, bring to the boil then reduce the heat and simmer for 5 minutes or until the sauce is reduced by half. Check and adjust the seasoning if necessary, then remove from the heat and allow to cool.


2.To make the pastry, sift the flour and a good pinch of salt into a bowl. Stir in the suet, add 100-150ml cold water and mix to a stiff dough. Reserve a quarter of the dough. Cut the rest of the dough in half. On a floured surface, roll each piece into a circle large enough to line each pudding basin, leaving a little overhang. Once the basins are lined, spoon in the cooled chestnut and mushroom filling.


3.Cut the reserved pastry in half and roll out each half into a circle to cover the tops of the puddings. Brush the edges with a little water and lay over the filling, pressing the dampened edges onto the overhanging pastry to seal. Trim away any excess. Cover with a piece of oiled kitchen foil and secure with string. Place the puddings in a bain-marie, make sure the water is above half way of your pudding bowl. Cover the bain-marie with 2 layers of foil to avoid browning the top. Bake in a 180C/ gas mark 4 oven for 1 hour.

Wednesday 10 December 2008

Rose and Lychee Sorbet

I found this recipe in 'The Cook's Book', however, I have altered the recipe so that I could use egg white in my sorbet. The egg white gives the sorbet a velvety texture.

3 cans tinned Lychee in syrup
80g caster sugar
100ml water
1 ½ table spoons rose syrup (red)
½ tablespoons rose water (clear)

2 egg whites, whisk to soft peak

1. Blend the lychees with the water into food processor until it becomes a runny pulp puree.
2. Pour the pulp into a sauce pan, add the sugar and bring it to boil. Simmer it until the liquid reduced by half, about 20-30 minutes, stir occasionally to avoid catching at the bottom. Stir in the rose syrup and water, remove from heat, and then blend it with hand held blend until smooth. Chill the mixture over night or at least 4 hours.3. Churn the mixture in ice-cream machine until it becomes slush. Fold in the whisked egg whites, while the ice-cream machine is churning. Churn until the mixture is smooth and the egg white is mixed well in. Put the sorbet mix into a plastic tub and freeze over night. Take it out from the freezer 10 minutes before serve.

Monday 8 December 2008

Apple, Walnut and Celery Salad with Camembert Dressing


The opening of a grand dinner without meat......

Apple, Walnut and Celery Salad with Camembert Dressing
Serves 6 for starter or 2 for lunch

Ingredients
Dressing:
250g round, ripe camembert
2 tbsp crème fraîche

Salad:
110g Cox’s apple, sliced
2 Hearts of Romaine
2 celery sticks

Garlic croutons:

50g bread, cut into small cube
1 tablespoon olive oil
1 cloves of garlic, crushed

Methods
1.Preheat an gas mark 4, 180oC oven.

2.Place the bread into a mix bowl, together with olive oil and garlic. Stir them around so that they get an even coating.

3.Arrange them onto a baking tray, bake them for 10 minutes or until they are crispy and golden. You may need to turn them around to get all sides crispy. Don’t go away from them, it is only 10 minutes, stay near the oven, otherwise you will forget.

4.Allow them to cool and leave them on one side until they are needed.

5.Then prepare the dressing. You can either peel the camembert skin carefully so you won’t waste too much, but I have found another method to do the trick. Put the whole cheese, with skin and everything (not the plastic wrap and the wooden case of course) into the microwave oven. Heat it at high heat for 2 minutes. The inside of the cheese will be melted, but still holding shape by the skin. Now, cut a circle at the top, then scrap the melted cheese into a sauce pan, and try to resist the smelly temptation.

6.Put the crème fraîche into the cheese, if you have dry cider at home, dash 1 tablespoon into it, so that the sauce would be less thick.

7.Now the salad, prepare them just before serving, tear the hearts of Romaine leaves into manageable pieces. Arrange them onto the serving plates, then the apple slice, and celery and then the walnut.

8.Scatter the croutons onto the salad and dress it with melted camembert. The dressing might start solidify at this point, re-warm the dressing under low heat until it is thin enough to serve.

Les Trois Mousquetaires and fondant fancies

I have been busy for a good few days. Regardless that I have taken the last few days off work, I have had no rest practically.

It is all because my beloved hunky boyfriend, Z kept me busy every night. No, I don’t mean like that. It was annual panto presented by Woolton Drama Group. I’m no actor in the group, but my culinary skills do make me lots of friends. Last year’s King Arthur brought bucket load of laughter to us, so we decided to portrait another monarch, however, this year the background is set in France....The Three Musketeers.

Z is the director of the panto. As the ‘woman’ behind the successful man, there are lots of background work needed to be done and iron out. Even with my busy schedule of work, gym, family and being pretty, I did my best to lift some of the stress from my loved one. As always, I was stressed through the last week, busy on making tabards for the musketeers and fondant fancy for the interval refreshments. I have been thinking hundred of time that I will not do all these again, it is always stressful and frustrated if the product didn’t turn out well. However, the compliment from the audience about my confectionary was rewarding, especially from those who don’t know me at all. One of the actress’ mum went to see the show, the first thing she said to her daughter after the performance was not about her appearance on stage, it was about my fondant fancies. They absolutely loved it. After all the hard work and time I put in, and then I heard that, it gives me a heart-warming feeling and passion for next creation.

Well, enough lollygagging, let’s get down to business. So, what is fondant fancy?

Fondant fancy is basically sponge cake, cut into square, brushed with jam all sides, with a dollop of butter cream on top, and then cover with fondant icing. Each fondant has to be iced individually, and coated all side. It was highly labour-intensive, a pair of hand is not enough to make ‘industrial’ quantity, even with Z’s helping hands. Therefore, I changed it into Victoria sponge with a twist.

Victorian Fancies (about 12 portions)

Sponge
3 eggs
6 oz caster sugar
6 oz spreadable butter
½ tsp lemon extract
6 oz self raising flour
2 tsp baking powder

Butter cream
175g icing sugar
75g butter

Rosé lime and lemon marmalade

Icing
1 Lemons, zest and juice
2 drops of natural yellow food colouring
250g-350g icing sugar

1.Preheat a 180oC/gas mark 4 oven.

2.Whisk the eggs and sugar together. Then mix in the butter and beat until fluffy.

3.Lemon extract goes in, and then sieve the flour and baking powder into the mix.

4.Fold the flour into the butter mix until lumps of flour disappeared.

5.Line a 12”x8”x1”deep baking tray with greaseproof/ non-stick baking paper.

6.Pour the mix into the tray and bake for 20 minutes.

7.Meanwhile, beat the butter and icing sugar to pale and fluffy, put a few drops of water if the mix is to stiff to work with.

Tips: You can test the sponge by pressing the top of it. If it bounced back and left no finger print, that’s done.

8.Cool down the cake at room temperature, it takes a few hours, but I usually cool it down over night. You should have a sponge about an inch thick.

9.Slice the sponge into two half-inch thick layers. Spread one layer with butter cream and then spread marmalade on top. Cover it with the second layer, then cut the cake into 12 squares, about 1.5 inches x 1.5 inches.

10.To make the icing, mix the lemon juice and zest and food colouring together.
Mix in the icing sugar gradually, beat until it reaches a cream-like consistency, add more icing sugar if it’s needed. Use it immediately.

11.Put the cake squares onto a griddle, put a tray underneath to catch dropped icing. Pour the icing on top of the cakes, let the icing flow over the edges and cover the sides. Don’t move it until it sets.

Friday 28 November 2008

Vegetarian Night

After the last successful ‘Nancy Boy’ dinner on my birthday, me and Emma decided to make another one, but with total vegetarian food, and yes, we do like challenge sometimes.

Shamefully, I actually don’t have much experience on veggie cooking. My culinary skill on this particular category is limited to veggie stir-fry and using meat substitute to make most of meat dishes into vegetarian. It has been some difficulties for two devoted carnivores to set up a quality vegetarian menu, but we got our starter and desserts sorted quite easily. I guess most of starter and desserts are vegetarian, it was not too hard to pick a good one. The hard bit was the main course, it has to be something more substantial, more powerful on visual impact and it should fill you up, so you feel satisfied. However, for an exquisite dinner, veggie lasagne, veggie cannelloni, veggie chill con carne, curry or stir-fry is not going to be good enough. Finally, we decided to make a pudding like steak and kidney pudding, but instead of those ‘bloody’ fillings, heart warming Portobello mushroom and chestnut are the ones to give you a winter hug.

So, what exactly is the menu? Brace yourselves, here we come.

Cold Starter
Heart of Romaine with apple, walnut and celery with camembert dressing
Warm Starter
Broccoli Cheese Souffle

Some of the recipe will be posted on here soon. Keep checking!!

Wednesday 26 November 2008

Answer to email: Smoked salmon and Spag Bog

Recently I received an email from my first blog fan. He asked me how to make smoked salmon and he had some difficulty when making pasta sauce. I can’t say that I’m an expert in Italian dishes. However, Spaghetti Bolognese is one of my mum’s crowd pleaser for many years, and I have picked up some tips from time to time.

Smoked Salmon & Cured Salmon

Facts of Smoked Salmon and Cured Salmon

Smoked Salmon is fresh salmon that has undergone a smoking process, usually by one of two methods-hot-smoking or cold-smoking. Most of supermarkets sell both types of smoked salmon. However, the delicate flavour of cold-smoked salmon makes it becomes people’s favourite. Also, it is very easy to use in cooking, either directly put on soda bread with sour cream as canapé, or slightly cooked in pasta.

Cured Salmon is practically raw fish. The method has been used for centuries to prevent food from spoiling. The process usually involved good quantity of sugar or salt or both. Herbs or citrus peel can be put into to make a dry rub mix which is then applied onto surface of the fish. It takes a few days to a week to ‘cook’ the fish, depends on the size of the fish. The sugar and salt draws a large amount of liquid from the fish and replacing it with sugar/salt mixture, thus gives the fish ‘cooked’-liked finish.

Even though, they are different in making process, their tastes are similar and can be applied in cooking in same way. However, of course, cured salmon has no smokiness.

Gravlax
This Swedish speciality of raw salmon cured in sugar-salt –dill mixture is famous around the world. The fish is sliced paper-thin and served on dark bread with mustard-dill sauce as appetizer.

I adopted the original recipe and came up with a citrus-flavoured cured salmon. I love it, and all of my family and friends love it, why don’t you give it a try.

450g/1lb salmon fillet (preferably middle-cut), pin bones removed
25g/1oz coarse sea salt
25g/1oz caster sugar
1 tsp crushed white peppercorns
1 lemon, zest only

Get two salmon fillets of total weight 450g/1lb. Ideally, they are about the same size. Wash the fillets and towel dries them.
Then mix the salt, sugar, pepper and zest in a mixing bowl. Lay a large piece of cling film on your worktop, and then put a quarter of the salt mix in the centre of the cling film. Put one fillet on top of the salt, skin side down. Then rub and other 2 quarters of the mixture on the salmon, put another piece of salmon on top, sprinkle the rest of the salt on top.
Wrap the fish with the cling film tightly. Then place the parcel on a shallow dish to prevent leaking of the liquid. Place another plate on top of the parcel, and apply some weight. Keep the fish in fridge for at 48 hours but no more than 3 days. Some liquid may leak out from the parcel, but don’t worry, that’s normal.
Before serve, unwrap the parcel, wash off any residual mixture from the fish with cold water, and then serve it the way you like.

------------------------------------------------------------------------------------------------
Spaghetti Bolognese

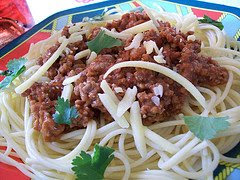
A world famous pasta dish that everyone loves, Spaghetti Bolognese is originated in Bologna, Italy. This pasta dish is with a meat based sauce, sometimes taken to be tomato sauce. However, the original recipe has very small amount of tomato paste, perhaps a couple of tablespoons.

The traditional ingredients of Bolognese sauce (Ragù) were confined by the recipe issued in 1982 by the Bolognese delegation of Accademia Italiana della Cucina. It involves beef, pancetta, onions, carrots, celery, tomato paste, meat broth, white wine, and milk. However, there are numerous of interpretation worldwide, and nowadays the term ‘Bolognese’ usually applied to a meat-tomato sauce, which vaguely bear the resemblance of traditional Ragù.

Ma Luk’s Spaghetti Bolognese
Serves: 4

450g/1 lb mince beef
3 cloves garlic, crushed and chopped
1 large onion, finely chopped
2 tomatoes, coarsely chopped
750ml pasta sauce
1 teaspoon sugar
Salt and pepper
150g Cheddar cheese, grated

350g dried pasta (Spaghetti, Penne, Rigatoni or Tagliatelle or any pasta you like)
30g butter, cut into knobs
1 tablesppon olive oil
2 teaspoon sugar
3 tablespoon ketchup

Heat 2 tablespoon of oil in a frying pan, fry garlic and onion to golden brown but do not burn, then fry the mince until just cooked.
Tip away some of the oil in the pan, then add the sauce, tomatoes and sugar. Stir through the mince and let it simmer for 15-20 minutes uncovered or until the sauce is reduced to two-third. Then add salt and pepper to taste. Set aside.
Preheat a 220oF/ gas mark 4-5 oven. Meanwhile, boil a large pan of salted water. Put the pasta into boiling water. Stir to avoid sticking and cook for 10-15 minutes or until al-dente.
Strain the pasta through a colander, put the pasta back into the pan. Put butter, oil, sugar and ketchup onto the pasta and mix until all pasta are coated.
Pour the pasta into a casserole dish, add the Bolognese on top, sprinkle grated cheese all over the top, then bake it in oven until the cheese is melted and golden.

Ben’s Spag Bog
Serves: 4

450g/1 lb mince beef
3 cloves garlic, crushed and chopped
1 large onion, finely chopped
1 tinned chopped tomatoes
300ml passata
1/2 tablespoon tomato paste
1 tablespoon dried oregano
1 teaspoon sugar
Salt and pepper

350g pasta
Parmesan cheese, finely grated to serve

Heat the pan with a few tablespoon of olive oil, then shape the beef into small meatballs, about less than an inch diameter and brown them all round. Remove them from the pan and set aside.
Use the same pan, fry the onion and garlic until golden but do not burn them. Pour in the tinned tomatoes, passata, tomato paste and oregano, mix well. Simmer the sauce to reduce to two-third, about 15-20 minutes. Then put the cooked beef balls into the sauce, simmer at low heat. Add salt and pepper to taste.
Boil the pasta according to instruction on the package. Then strain them and put it back to the pan. Stir through a couple spoons of olive oil, then pour the sauce into the pasta, mix through and serve with grated parmesan and extra black pepper.

Tips: if the sauce was runny, but you would like to have good amount of sauce. Thicken the sauce with flour and water mixture (1 tablespoon of flour to 2.5 tablespoon of water). Do not pour the mixture all at once, pour them in portions and stir until it thickens to your like.


As I mentioned before, spaghetti Bolognese has different interpretation. You could put more vegetable, such as mushroom and celery. You also could use basil instead of oregano. I hope you all are happy making spag bog with your own style J